Certifications
To view, edit and delete employee’s certifications.
- 1. Click the Employee Info menu.
- 2. Select the Certifications sub-menu. The “Certification” section is expanded.
- 3. Click the Add Certification link text. The Add Employee Certification dialog box appears,
- 4. Enter below details in the Add Employee Certification dialog box.
- 5. Click the Save button. The employee certification is saved in the database and displayed in tabular format.
- 6. Click the Details icon under Actions column to view employee’s certification. The View Employee Certification dialog box appears.
- 7. Close the View Employee Certification dialog box.
- 8. Click the Edit icon under Actions column to modify employee’s certification. The Edit Employee Certification dialog box appears.
- 9. Make required changes, and click the Save button to update the certification details. The “Certification updated” message is displayed and table is loaded with updated details.
- 10. Click the Delete icon under Actions column to delete the certification record.
Dependents
To view, edit and delete employee’s dependents.
- 1. Click the Employee Info menu.
- 2. Select the Dependents sub-menu. The “Dependents” section is expanded.
- 3. Click the Add Dependent link text. The Add Employee Dependent dialog box appears.
- 4. Enter the below details in Add Employee Dependent dialog box.
- 5. Click the Save button. The dependent detail is saved in the database and displayed in the tabular format.
- 6. Click the Details icon under Actions column to view existing dependents. The View Employee Dependent dialog box appears.
- 7. Close the View Employee Dependent dialog box.
- 8. Click the Edit icon under Actions column to modify the dependents’ details. The Edit Employee Dependent dialog box appears.
- 9. Make required changes, and click the Save button to update the dependent details. The “Dependent updated “message is displayed and table is loaded with updated details.
- 10. Click the Delete icon under Actions column to delete the dependent record.
Emergency Contacts
To view, edit and delete employee’s emergency contacts
- 1. Click the Employee Info menu.
- 2. Select the Emergency Contacts sub-menu. The “Emergency Contacts” section is expanded.
- 3. Click the Add Emergency Contact link text. The Add Emergency Contact dialog box appears.
- 4. Enter below details in the Add Emergency Contact dialog box.
- 5. Click the Save button. The emergency contact is saved in the database and displayed in the tabular format.
- 6. Click the Details icon under Actions column to view the available contacts. The View Emergency Contact dialog box appears
- 7. Close the View Emergency Contact dialog box
- 8. Click the Edit icon under Actions column to modify the emergency contact. The Edit Emergency Contact dialog box appears.
- 9. Make required changes, and click the Save ( ) button to update contact details. The “Emergency contact updated” message is displayed and emergency contacts table is loaded with updated details.
- 10.Click the Delete icon under Actions column to delete the emergency contacts
Medical Contacts
To view, edit and delete employee’s medical contacts.
- 1. Click the Employee Info menu.
- 2. Select the Medical Contacts sub-menu. The “Medical Contacts” section is expanded.
- 3. Click the Add Medical Contacts link text. The Add Medical Contact dialog box appears.
- 4. Enter below details in the Add Medical Contact dialog box.
- 5. Click the Save button. The medical contact is saved in the database and displayed in tabular format.
- 6. Click the Details icon under Actions column to view the existing medical contacts of the employee. The View Medical Contacts dialog box appears.
- 7. Close the View Medical Contact dialog box.
- 8. Click the Edit icon under Actions column to modify the medical contact details. The Edit Medical Contact dialog box appears.
- 9. Click the Save button to update the contact details. The “Medical contact updated” message is displayed and medical contacts table is loaded with updated details.
- 10. Click the Delete icon under Actions column to delete the medical contact.
Resume
To view, edit and delete employee’s resume
- 1. Click the Employee Info menu
- 2. Select the Resumes sub-menu. The “Resumes” section is expanded.
- 3. Click the Add Resume link text. The Add Resume dialog box appears.
- 4. Enter the below details in Add Resume dialog box: a. Resume Name b. File Name – (Accepted file formats .pdf,.doc,.docx,.rtf,.txt)
- 5. Click the Save button. The employee resume is saved in the database and displayed in the tabular format
- 6. Click the Details icon under Actions column to view the current resume. The File Preview dialog box appears
- 7. Click the OK button to close the File Preview dialog box.
- 8. Click the Edit icon under Actions column to modify the resume. The Edit Resume dialog box appears.
- 9. Click the Save button to update the resume. The “Resume updated” message is displayed and table is loaded with updated details.
- 10. Click the Delete icon under Actions column to delete the resume.
Travel History
To view, edit and delete employee’s travel history.
- 1. Click the Employee Info menu.
- 2. Select the Travel History sub-menu. The “Travel History” section is expanded
- 3. Click the Add Travel History link text. The Add Travel History dialog box appears.
- 4. Enter below details in the Add Travel History dialog box.
- 5. Click the Save button. The travel history of employee is saved in the database and displayed in tabular format.
- 6. Click the Details icon under Actions column to view the existing travel history of the employee. The View Travel History dialog box appears.
- 7. Close the View Travel History dialog box.
- 8. Click the Edit icon under Actions column to modify the travel history details. The Edit Travel History dialog box appears.
- 9. Click the Save button to update the history details. The “Travel History updated” message is displayed and travel history table is loaded with updated details.
- 10. Click the Delete icon under Actions column to delete employee travel history records.
Passport
To view, edit and delete employee’s passport details
- 1. Click the Employee Info menu.
- 2. Select the Passport sub-menu. The “Passport” section is expanded.
- 3. Click the Add Passport link text. The Add Passport dialog box appears
- 4. Enter below details in the Add Passport dialog box.
- 5. Click the Save button. The passport details of employee are saved in the database and displayed in tabular format.
- 6. Click the Details icon under Actions column to view the existing passport details of the employee. The View Passport dialog box appears.
- 7. Close the View Passport dialog box.
- 8. Click the Edit icon under Actions column to modify the passport details. The Edit Passport dialog box appears.
- 9. Click the Save button to update the passport details. The “Passport updated” message is displayed and passport table is loaded with updated details.
- 10. Click the Delete icon under Actions column to delete the passport details of employee
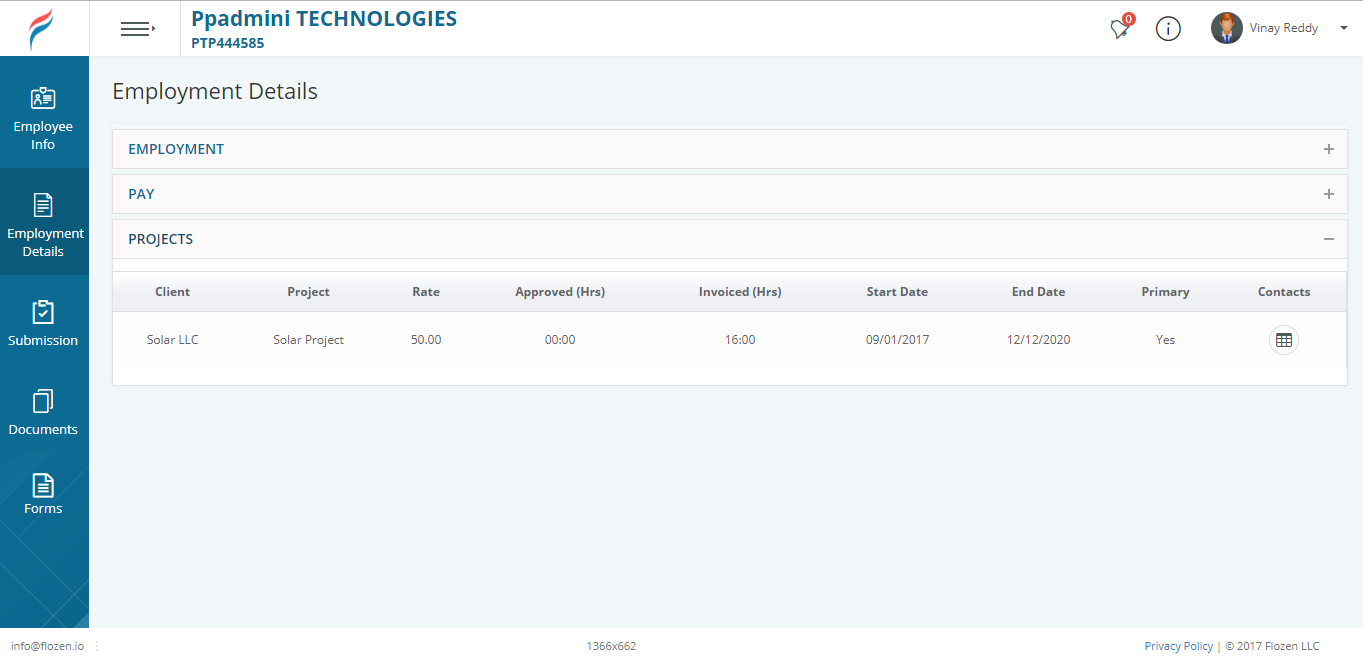
Employment Details
User cannot make changes in the employment details except for project contacts. User is only able to view the employment details that have been predefined by the administrator and are restricted from being edited.
Employment
Employment details of employee are predefined by HR admin at the time of verification. To view employment details, perform the below steps
- 1. Click the Employment Details menu in the left navigation bar. The Employment Details menu is expanded with sub-menus – Employment, Pay and Contacts.
- 2. Select the Employment sub-menu. User can view the following employment details.
Pay
Compensation/Pay details of employee are predefined by HR admin at the time of verification. To view pay details, perform the below steps:
- 1. Click the Employment Details menu.
- 2. Select the Pay sub-menu.
- 3. User can view the following details in the Pay tab.
Projects
This tab displays the projects assigned to the employee in the tabular format. To view projects assigned to the employee, perform the below steps:
Project Contacts
Project Contacts icon is available in the Projects table under Contacts column. User can add, view and edit the contacts by performing the below steps:
- 1. Click the Details icon ( ) in the projects table under Actions column. The Project Contacts dialog box appears.
- 2. Click the link text. The Add Project Contact dialog box appears.
- 3. Enter below details in the Add Project Contact dialog box
- 4. Click the Save ( ) button. The project contact is saved and displayed in the tabular format.
- 5. Click the Details icon ( ) under Actions column to view project contacts. The View Project Contacts dialog box appears.
- 6. Click the (X) icon to close the View Project Contact dialog box.
- 7. Click the Edit icon ( ) under Actions column to modify contacts. The Edit Project Contacts dialog box appears.
- 8. Click the Save ( ) button to update the project contacts. The “Project contact updated” message is displayed and contacts table is loaded with updated details.
- 9. Click the (X) icon to close the Project Contacts dialog box.
Submission
Employee can submit Timesheet, Expenses and Status report from this module.
Timesheets
This section describes the employee timesheet. Perform the below steps to work with timesheet:
- 1. Click the Submission menu in the left navigation bar.
- 2. Select Time Sheet Summary sub-menu. The Timesheet Summary page appears with search parameters.
- 3. Select project, month, year and status to search the record(s).
- 4. Select a record and click the Edit icon ( )under Actions column. Timesheet period page appears.
Note:
Once project is assigned to an employee, the timesheet records are created in the summary table based on project invoicing terms and weekend day. Default records from current invoice timesheet period are loaded in summary table. To view all the created timesheet records, select Effective Date check box. New records are created in summary table if assignment period is extended. User can submit the timesheet for future date till assignment end date. User can enter timesheet for single or multiple weeks and can attach single or multiple files. User can enable or hide weekends and holidays by selecting the Enable Weekends and Enable Holidays check boxes. When employee enters the time, Total and Grand Total is auto calculated and displayed.
Timesheet Entry
To create an entry in Time sheet, perform the below steps:
- 1. Client, Project, Employee and Time sheet period are displayed by default.
- 2. History field is available to view the comments.
- 3. Enter Timesheet efforts for single or multiple weeks for the default task.
- 4. Click the Add New Task ( ) button. The new task appears in Timesheet entry.
- 5. Select/ clear the check box to make the Timesheet billable/ non-billable.
- 6. Enter Timesheet efforts.
- 7. Add Comments.
- 8. Click the link text to attach client approved Timesheet file. The Add Attachment dialog box appears.
- 9. Enter below details in the Add Attachments dialog box:
- a.Start Date
- b.End Date
- c.Attachment (Approved file formats are .jpg, .jpeg, .pdf)
- 10. Click the Save ( ) button. The Timesheet file is saved and loaded in attachments table.
- 11. Click the Preview button. File preview appears.
- 12. Click the OK button to close the File Preview dialog box.
- 13. Click the Delete icon ( ) to delete the attached Timesheet files.
- 14. Click the Save button to save the Timesheet. Employee is redirected to the Timesheet summary page with saved data. Now the status of Timesheet is Saved.
- 15. Click the Submit ( ) button to submit the Timesheet for admin verification. The “Timesheet submitted” message is displayed and employee is redirected to Timesheet summary page with saved data. Now, the status of Timesheet is Submitted.
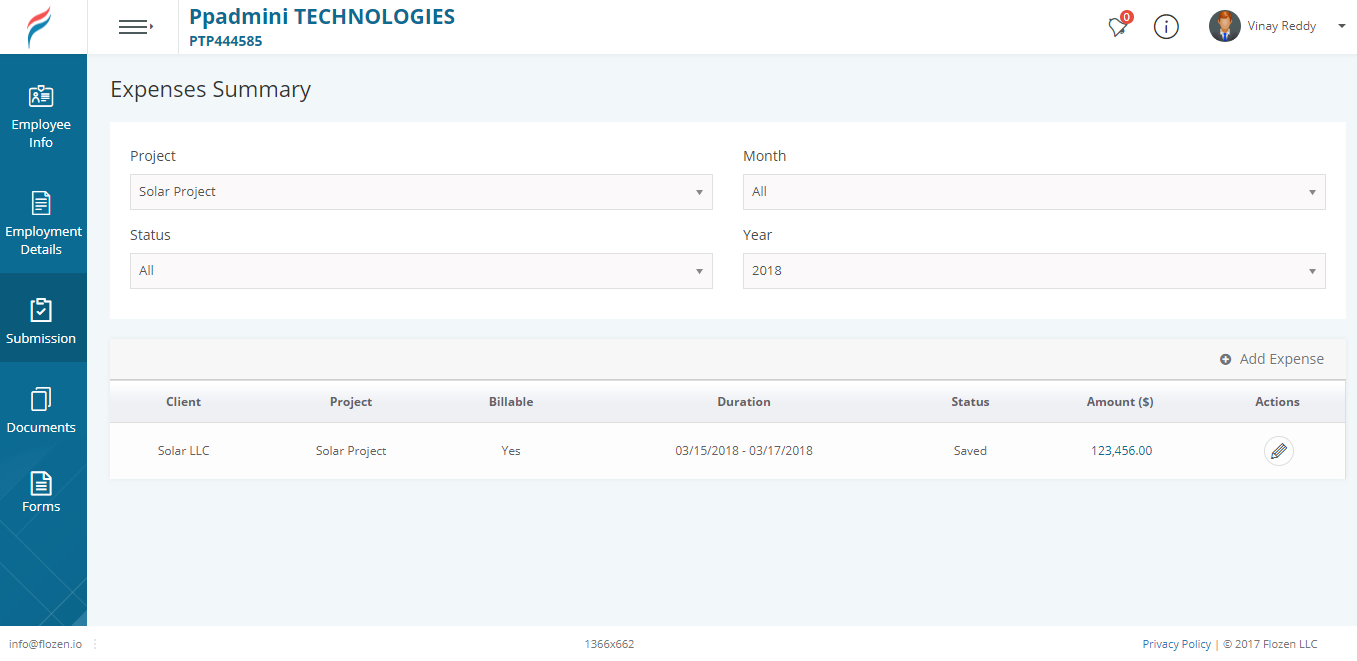
Expenses
This module allows the user to enter other expenses. To do so, perform the below steps:
- 1. Click the Submission menu.
- 2. Select the Expenses sub-menu. The Expense Summary page appears with search parameters.
- 3. Click the link text. The Expense entry page appears. Expense entry page appears with Approver Name and Attach Approval File fields.
- 4. Employee name is displayed by default in expense entry page.
- 5. Select the details in the expense entry page
- 6. Enter Approver Name and select Attach Approval File (.pdf, .jpg, .jpeg).
- 7. Click the link text. The Add Receipt dialog box appears.
- 8. Enter the below details in Add Receipt dialog box.
- 9. Click the Save ( ) button. Receipts are saved and loaded in table.
- 10. Click the Details icon ( ) under Actions column. The View Receipt dialog box appears.
- 11. Click the (X) icon to close the View Receipt dialog box.
- 12. Click the Edit icon ( ) under Actions column. The Edit Receipt dialog box appears.
- 13. Click the Save ( ) button to update the details. The “Expense detail updated” message is displayed and table is loaded with updated details.
- 14. Click the Delete icon ( ) under Actions column to delete the expense receipt.
- 15. Click the Save ( ) button to save the expenses. Employee is redirected to the Expense Summary page with saved data. Now, the status of Expense is Saved.
- 16. Click the Submit ( ) button to submit the expenses for admin verification. The “Expense has been submitted” message is displayed and employee is redirected to Expenses Summary page. Now, the status of expense is Submitted.
- 17. Click the Edit icon ( ) to do necessary changes in expense details.
Note:
Different expense status can be as Saved, Submitted, Approved and Invoiced. Employee can edit the expenses till the efforts are invoiced.
Status Reporting
To check and add employee status report, perform the below steps:
- 1. Click the Submission menu.
- 2. Select the Status Reporting sub-menu. The Status Report summary page appears with search parameters.
- 3. Select project, status, month and year.
- 4. Click the Edit icon ( ) for the selected record. The Status Report Period page appears.
- 5. Click the Add ( ) button under Accomplishment/Completed caption. The Edit box is enabled.
- 6. Enter the status details in the Edit box.
- 7. Click the Add ( ) button under In Progress caption. The Edit box is enabled.
- 8. Enter the status details in the Edit box.
- 9. Click the Add ( ) button under Planned for Next Period caption. The Edit box is enabled.
- 10. Enter the status details in the Edit box.
- 11. Click the Add ( ) button under Risks/Challenges/Issues. The Edit box is enabled.
- 12. Enter the status details in the Edit box. After entering all the details in status report entry page, screen appears.
- 13. Click the Save ( ) button. The “Status report updated” message is displayed and redirected to summary page with status Save.
- 14. Click the Save & Submit ( ) button. The “Status report updated” message is displayed and redirected to the summary page with status Submitted.
Note:
Status report is editable if the status is as Saved. Status report is not editable if the status is as Submitted.
Documents
Documents related to Employee Education, Experience, Certification, Resume and Timesheet are available in this module.
To view documents, perform the below steps:
- 1. Click the Documents menu in the left navigation bar.
- 2. Select the Documents sub-menu. The Employee Documents page appears.
- 3. The Others option is used to upload any other relevant documents of an employee. When the user clicks the Others option, the Upload ( ) button gets enabled.
- 4. Click the Upload ( ) button. The Upload Other Documents dialog box appears as.
- 5. Enter below details in the Upload Other Document dialog box:
- a. Name
- b. Attach file (acceptable file formats are .pdf, .doc, .docx, .rtf, .txt)
- 6. Click the Save ( ) button. Other document is saved in the database.
- 7. To view the file preview, expand the Others option.
- 8. Click the file name. The File preview page appears.
Forms
This module describes the employee forms.
Form W4
To work with employee forms, perform below steps:
- 1. Click the Forms menu in the left navigation bar.
- 2. Select the Form W4 sub-menu. The Form W4 Summary table is displayed.
- 3. Click the Document ( ) icon under Actions column. The Form W4 file preview appears.
- 4. Click the OK ( ) button to close the file preview.
- 5. Click the Edit icon ( ) under Actions column. The Form W4 appears.
- 6. Employee can enter/update below details under the Employee’s Withholding Allowance Certificate:
- a. SSN
- b. Marital Status
- c. Total number of allowances you are claiming
- d. Additional amount that you want to withhold from each pay Cheque
- 7. Select the confirmation check box. The Submit button gets enabled.
- 8. Enter Signature of an employee.
- 9. Click the Submit button. The “Form W4 updated” message is displayed and employee is redirected to W4 Form Summary table.
Time Off
To work with Time off, perform the below steps:
- 1. Click the Forms menu.
- 2. Select the Time Off sub-menu. The Time Off Summary page is loaded.
- 3. Click the link text. The Time Off Request dialog box appears.
- 4. Enter the below details in Time Off Request dialog box.
- 5. Click the Request Time Off button. The “Time off request has been submitted” message is displayed and table is loaded with Details, Edit and Delete actions, as shown.
Note:
To request for employee time off, the time off policies should be set at company level and assigned to employee.
- 6. Click the Details icon under Actions column to view Time Off details. The View Time Off Request dialog box appears.
- 7. Close the View Time Off Request dialog box.
- 8. Click the Edit icon under Actions column to modify Time Off details. The Edit Time Off Request dialog box appears.
- 9. Click the Request Time Off button to update the time off details. The “Time off request updated” message is displayed and table is loaded with updated details.
- 10. Click the Delete icon ( ) under Actions column to delete the time off request.
Note:
Time off request should be verified by an employee admin. Once Time off request is approved by employee admin, the Time Off Balances table appears.
Employee User Profile
To view the employee user profile, click the Employee user icon. The Employee User Profile menu is expanded with sub-menus- Switch Company, Profile, Help and Logout.
Profile
To view employee profile, perform the below steps:
- 1. Click the Employee user icon.
- 2. Click the Profile icon under user menu. The Profile page appears with personal, contact and address.
- 3. Employee can enter/edit below details under the Profile tab.
- 4. Click the Submit ( ) button. The “Profile updated” message is displayed and updated data is saved in the database.
- 5. Click the Change button under profile. It is saved as employee profile picture and displayed.
Security
This module provides options to view and manage security settings of the user.
Change Password
To change password, perform the below steps:
- 1. Click the Employee User icon.
- 2. Click the Profile icon under user menu.
- 3. Select the Security tab. The Change password screen appears.
- 4. To change the current password, Enter Old password, New password and Confirm Password.
- 5. Click the Change Password button. The “Password has been updated” message is displayed and new password is saved in the database.
Note:
If existing password is entered as new password, the “same password is not accepted” message is displayed.
Assets
Employee can request the admin for assets exist in the company. To request for assets, perform the below steps:
- 1. Click the Employee user icon.
- 2. Click the Profile icon under user menu.
- 3. Go to Assets tab. The Assets page appears.
- 4. Click the link text. The Request Asset dialog box appears.
- 5. Enter the below details in Request Asset dialog box.
- 6. Click the Request Asset button. The “Asset request has been submitted” message is displayed and table is loaded.
- 7. Click the Details icon under Actions column to view asset request. The View Asset Request dialog box appears.
- 8. Click the (X) icon to close the View Asset Request dialog box.
- 9. Click the Edit icon under Actions column to modify the asset request. The Edit Asset Request dialog box appears.
- 10. Click the Request Asset button to update the asset details. The “Asset request updated” message is displayed and table is loaded with updated details.
- 11. Click the Delete icon under Actions column to delete the asset request.
Note:
Once asset request is submitted, admin will verify and assign the asset to requested employee.
Help
This module is used for support and feedback purpose.
Support Details
Application support details are displayed and product feedback can be submitted from this module. To view support details, perform the below steps:
- 1. Click the Employee user icon.
- 2. Click the Help icon under user menu. The Help page appears with Support Details and Product Feedback tabs.
- 3. The Support Details tab is selected by default and displays all the details related to support.
Product Feedback
To submit product feedback, perform the below steps:
- 1. Click the Employee user icon.
- 2. Click the Help icon under user menu. The Support details are displayed.
- 3. Select the Product Feedback tab. The Defect radio button is selected by default.
- 4. Enter below details in the Product Feedback tab under Defect radio button.
- 5. Click the Submit button. The “Feedback has been submitted” message is displayed and submitted to company contact person.
- 6. Select the Feature radio button. The Feature page appears.
- 7. Enter the below details in Product Feedback tab under Feature radio button.
- 8. Click the Submit ( ) button. The “Feedback has been submitted” message is displayed and submitted to company contact person.